
Custom-Cut Bistro String Lights: Reels, Connectors & Planning
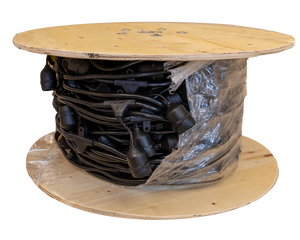

You can cut a string light only when its manufacturer designs and documents it for that purpose. The Brilliance 12V bistro reel is a cut-to-length system; its preassembled 120V bistro kit is a different product and should not be modified using the low-voltage accessories.
A successful custom layout begins with the bulb choice, feed locations and supported route. Cutting first and solving the electrical layout afterward can leave a section too long for the lamps or too short for a proper connection.
Start with a plan and a parts list
The Brilliance 328-foot reel uses 14 AWG cable with lamp positions spaced 24 inches apart. The spool supplies material for multiple sections. Lamps, electrical connectors, mounting cable, turnbuckles and a suitable power supply are separate purchases.

| Part | Role in the layout | How to count |
|---|---|---|
| Straight connector | Transition between landscape cable and the bistro string's SO cable | One per cable conversion |
| T connector | Center feed in the approved layout | One per center feed |
| End cap | Finish a string cable end | One per end requiring termination |
| Mounting cable and supports | Carry the string along its planned route | Size and quantity determined by spans, anchors and instructions |
| 12V S14 lamps and supply | Provide the light and correct electrical input | Actual sockets, lamp VA and permitted run lengths |
Make a section schedule before cutting
For each section, write down its measured route, lamp count, lamp model, feed point, end treatment and mounting points. Record the feed cable length separately from the illuminated string length. Leave the manufacturer's connection allowance: Brilliance calls for at least 10 inches of lead for connections. Locate proposed cuts so the required lead and sockets fit the finished design.
As a simple parts-counting example, two independent end-fed sections, each with one landscape-to-string transition and one free string end, need two straight connectors and two end caps. That is an inventory example, not an approved wiring plan; another layout may require different accessories.
Check electrical limits for every section
Brilliance's published limits vary with its specified lamp wattage. Review the bulb selection and maximum-run table before finalizing cuts. A center-fed arrangement still needs each branch checked and its total load included at the source. Connector placement does not increase cable or transformer capacity.
For a mixed-wattage or different-brand lamp design, get the actual lamp VA and system compatibility confirmed. Do not invent a proportional limit from the table. The same 100 feet of string can require a different design when the lamp changes.
Use the manufacturer's assembly sequence
Disconnect power before preparing or joining cable. The Brilliance connector guide (PDF) provides illustrated instructions for the correct grommets, cable preparation, terminal connections and compression nuts. Its straight-connector instructions distinguish the landscape-cable side from the SO-cable side; do not treat the two entries as identical.
Follow the guide for end sealing, including the specified silicone step and the sealant manufacturer's cure time. Ensure conductors cannot touch each other at a terminated end. Do not substitute electrical tape for the designated connector or end cap. If a part, cable size or assembly does not match the guide, resolve that mismatch before energizing.
Support, inspect and label the finished layout
Use the string's intended mounting holes and appropriate suspension components. Check that a cable entry is not carrying avoidable mechanical strain and that connections can be inspected. Keep enough documentation to identify each feed, lamp model and load when a lamp needs replacing.
Before use, have the completed electrical arrangement checked as needed, inspect the seals and supports, and confirm operation across the intended dimming range. Revisit the design whenever you add lamps or change their wattage. For work near water, apply the separate pool-area safety review before choosing the route.
When a pre-sized kit is simpler
If the supplied length matches your route, the 50-foot 12V kit includes hanging hardware and reduces the suspension parts you need to assemble separately. It still needs lamps, connectors and an appropriate transformer. The best starting point is the system whose documented limits fit the project.
Manufacturer reference
Brilliance reel specifications and accessories and illustrated kit and connector guide
Continue planning your project
- How to Hang Outdoor String Lights: Layout, Supports & Power
- Bistro Light Bulbs & Maximum Run Length: 12V vs. 120V
- String Lights Near Pools: Safety, Clearances & NEC Planning
Shop bistro lights, kits and connectors · Compare S14 LED bulbs
- Jenny Branch