
WAC Hardscape Lighting: Placement & Quick Connect Guide
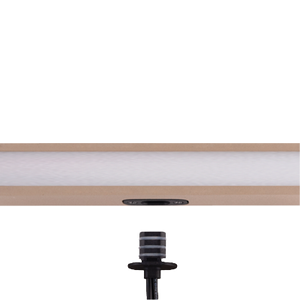

A successful WAC hardscape lighting layout accounts for what happens both on installation day and years later. Where will the light fall? Can someone sitting nearby see the source? Will the installer be able to reach the controls and service the LED engine after the capstones are secured? Answer those questions before finalizing fixture locations.
This planning guide focuses on WAC’s standard Quick Connect hardscape family. Start with the WAC hardscape lights collection for model choices, or use our size, dimming and CCT buying guide to select a family.
Survey the wall before choosing positions
Draw the wall, steps and nearby seating as a simple plan. Mark the cap overhang, corners, columns, changes in height and possible cable routes. Add the normal viewing positions: the lower path, the patio table and the approach from the house. These viewpoints are more useful than a single photograph taken directly in front of the wall.
Plan access during new construction
Agree on the lighting locations with the masonry contractor before the caps are secured. Compare the chosen fixture drawing with the actual space available. Record where wiring will travel and where connections can be accessed. Coordinate that plan with the electrical installer rather than leaving the cable route until the wall is complete.
Evaluate a retrofit separately
An existing wall may limit which mounting method is practical. A narrow joint is not proof that an under-cap bracket will fit or that the cable can be routed correctly. WAC’s serviceable design addresses access to the installed light engine; it does not guarantee that the first installation requires no masonry work. Assess the finished structure before choosing the fixture.
Set spacing with a nighttime mockup
There is no single spacing number that fits every WAC hardscape project. Make a temporary, properly powered mockup of the proposed model at the intended mounting height. Look at one fixture first, then a second at the proposed distance. Decide whether the pattern should read as distinct pools or a more continuous effect.
- Check the wall from the approach and from nearby seating.
- Look for unwanted bright spots and dark areas between fixtures.
- Evaluate corners and changes in surface color separately.
- Adjust position before using brightness to refine the effect.
- Record the approved layout for the installer.
On stairs, inspect the walking surface from both directions. A brightly lit riser can still leave part of a tread difficult to see. Lighting design must also satisfy the project’s applicable requirements.
Control glare before increasing output
Aim for a comfortable view of the illuminated surface. If the light source is visible from a chair, first reconsider its location, shielding by the cap and permitted aiming. More output can make that problem worse. Test the scene at normal nighttime ambient light levels rather than judging it only at dusk.
Use WAC’s onboard brightness adjustment
The standard 7062, 7122 and 7182 have an onboard dimming dial. During commissioning, balance neighboring fixtures after their locations are established. Keep a record of the final settings so a serviced fixture can be returned to the intended appearance.
Set the onboard CCT selector
Those models also offer a 2700K/3000K selector. WAC’s instructions specify that the CCT dial goes fully left for 2700K or fully right for 3000K. It is not a continuously variable color-temperature dial. The 7032 has neither this selector nor the onboard dimming function.
Follow the manufacturer’s adjustment procedure and electrical precautions. Read the WAC Quick Connect hardscape installation and adjustment instructions (PDF) before working on the fixture.
Understand the quick-disconnect service benefit
The detachable connection and removable light engine allow service at the installed bracket. Preserve the space needed to reach the retaining screws and remove the engine; do not obstruct that access with a later trim detail or landscaping addition. Obtain the compatible WAC service component for the exact model and follow the replacement procedure with power isolated.

Size the transformer and cable as one system
List all loads by run and use manufacturer VA values for transformer sizing. Include cable length and voltage drop in the design. A transformer with enough total capacity does not by itself prove that the farthest fixture will receive the correct voltage. Have the installer verify the system under load against each model’s requirements.
Browse landscape transformers and lighting wire after the fixture schedule is established. Standard white-light models and COLORSCAPING models have different system requirements.
Plan connections for their actual exposure
Choose connectors for the conductor sizes and installation environment, including direct-burial suitability wherever that is required. The fixture’s quick-disconnect connection does not replace the separate connection between the fixture lead and the landscape cable. Review our waterproof wire connectors and follow the connector and fixture instructions.
Commission and document the finished project
- Verify each full SKU against the purchase schedule.
- Check the light pattern at stairs, seating and transitions.
- Confirm the intended white-light setting at every dual-CCT fixture.
- Record brightness settings, transformer model and cable runs.
- Photograph connection and service locations before they become difficult to identify.
If one fixture later appears different, compare its recorded settings and inspect the lens before assuming the engine has failed. Electrical diagnosis and service should follow WAC’s instructions and be performed by a qualified installer.
Conclusion: make service access part of the design
Placement, controls and serviceability work together. Establish a comfortable light pattern, commission the onboard controls and preserve access to the Quick Connect assembly. This creates a clearer installation plan and better records for future maintenance.
For broader applications beyond this WAC family, see our hardscape lighting guide for steps, walls and outdoor kitchens.
For a project checklist covering new walls and retrofits, read our retaining wall lighting installation guide. It brings together mounting access, nighttime spacing checks, cable planning and final commissioning.
Frequently asked questions
How far apart should WAC hardscape lights be?
Use the selected model, mounting height and desired overlap to establish spacing with a nighttime mockup. A spacing recommendation for another fixture is not automatically appropriate for yours.
Can brightness adjustment fix poor placement?
It can refine the result, but it cannot move the light pattern or hide an exposed source. Resolve sightlines and coverage before final adjustment.
Can I use an ordinary wall dimmer?
Do not infer wall-dimmer compatibility from the presence of an onboard control. Confirm the complete fixture, transformer and external control combination with WAC before adding a separate dimmer.
Does Quick Connect eliminate every reason to remove a capstone?
No. It improves access to the installed light engine. Initial mounting work or unrelated wiring and masonry repairs can still require access to the surrounding structure.
What should I send when asking for help selecting fixtures?
Provide wall length and height, cap dimensions, side-view photographs, the desired effect and the existing transformer model, if any. Include whether you want white light or COLORSCAPING scenes.
Manufacturer basis: WAC 7032/7062/7122/7182 instructions and WAC hardscape feature overview. This is a planning guide; the model-specific installation instructions govern the work.
Shop WAC hardscape lights for your wall and step lighting project
- Atlantic Lighting