
How to Light an Outdoor Sign: Placement & 120V Fixtures

Good outdoor sign lighting makes the entire message readable without a glaring center, dark edges, or light spilling into the street. Start with the sign’s dimensions, viewing direction, surface finish, and available mounting positions. Then choose a fixture distribution that fits the face of the sign.
This guide covers externally illuminated business and monument signs. It focuses on fixtures that shine onto the sign, including 120V outdoor flood and sign-lighting options. Internally illuminated cabinets and digital displays use different systems.
Start with the sign and the viewing position
- Measure the illuminated face: width, height, and height above grade.
- Record the surface: light or dark background, glossy panels, raised letters, borders, and projections.
- Identify the audience: approaching vehicles, pedestrians, or both, and the direction from which the sign must be read.
- Measure mounting options: distance from fixture to sign, available arm extension, ground setback, and obstructions.
- Check the site: nearby windows, roadways, landscaping, power supply, and access for service.
A narrow, tall sign and a wide monument sign can require different distributions even when their total areas are similar. Raised letters may cast shadows, while glossy finishes may reflect a bright source toward one viewing position. Review those effects before choosing output.
WAC 5222: adjustable 120V coverage for signs
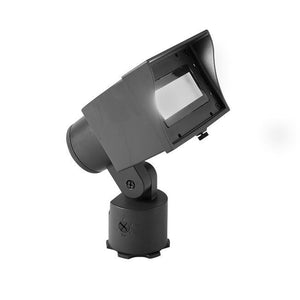
The WAC 5222-30BK adjustable-beam wall wash is a strong option to evaluate for 120V sign lighting when its mounting arrangement and distribution fit the site. It lets the installer adjust the beam spread and brightness, and rotate the head to change the distribution’s orientation.

WAC 5222 adjustable-beam wall wash family; select the exact finish and color temperature on the product page.
WAC lists adjustable distributions including 35° × 60°, 60° × 90°, and 90° × 120°. Those two dimensions matter for a sign: a rectangular spread can match a broad face more effectively than simply increasing the output of a concentrated circular beam. Confirm the head orientation when interpreting the horizontal and vertical dimensions.
Use the WAC 5222 specifications and photometric diagrams to compare coverage at the planned mounting distance. The diagrams support layout decisions; they are not a guarantee that one fixture will evenly illuminate every sign of a particular width. Review the exact configuration and verify the finished result.
WAC 5222 versus Endurance sign lights
| Option | Why consider it | Confirm before ordering |
|---|---|---|
| WAC 5222 adjustable wall wash | Adjustable rectangular distribution, integral brightness control, and head rotation | Approved mount and accessories; distribution orientation; actual sign coverage |
| WAC Endurance WP-LED514 single-head sign light | Dedicated sign-lighting assembly with adjustable spot-to-flood beam and extension rods | Arm reach, mounting structure, shroud position, and required safety-cable arrangement |
| WAC Endurance WP-LED529 double-head sign light | Two adjustable heads for a layout that benefits from separately aimed coverage | Combined coverage, overlap, mounting loads, and assembly instructions |
Endurance WP-LED514 and WP-LED529 use a 120V supply and adjustable beams indexed at 15°, 25°, 40°, and 60°. Their rod-and-canopy arrangement offers a different mounting approach from a landscape wall washer. A double-head fixture is not automatically the correct answer for a large sign; the placement and distribution still need to cover the face.

WAC Endurance WP-LED529 double-head sign-lighting assembly.
Review the hosted Endurance installation instructions for assembly, sealing, mounting, and safety-cable details. Use the approved hardware and the instructions supplied with the exact fixture.
Mount above the sign or light it from the ground?
Above-sign mounting can direct light downward onto a wall-mounted sign. Check that the arm reaches far enough to cover the lower portion and that raised letters do not cast distracting shadows. Confirm the building attachment and maintenance access.
Ground-mounted lighting can work for monument signs when the fixtures have a clear path to the face. Keep planting, irrigation, vehicles, and lawn maintenance in mind. Aim within the sign’s boundary and check the view from the road so drivers do not look directly into the source.
Do not choose the mount solely because power is convenient there. A poor angle can create glare or unevenness that extra output cannot correct. Use a qualified electrician for hardwired 120V installation and confirm applicable local sign and lighting requirements before finalizing the work.
How many sign lights do you need?
There is no dependable “one light per several feet” rule for every sign. The same fixture produces a different pattern when its distance, angle, or beam setting changes. A larger area may need multiple positions, while a smaller sign may need a narrower distribution to keep light on the face.
- Draw the sign and proposed fixture locations. Include mounting height, setback, and obstacles.
- Use the selected fixture’s photometric data. Evaluate light reaching the vertical sign face rather than relying only on total lumens.
- Check the whole face. Compare the center, corners, edges, and areas between fixtures.
- Review overlap. Avoid both dark seams and excessively bright bands where patterns meet.
- Confirm after dark. Read the sign from the intended approach and adjust aim, beam, and output.
For example, a wide monument sign with landscaping in front may need a different fixture position rather than a brighter light in the original location. Test the clear line of light first. If a commercial project needs a calculated lighting level or uniformity criterion, have the designer model the actual sign and fixture configuration.
Choose color and controls deliberately
Test the available white-light color on the actual graphics. Brand colors, surface reflectance, and nearby lighting affect the result. Keep multiple fixtures consistent unless the design calls for a deliberate difference.
A photocell or timer can coordinate operating hours, but compatibility and inclusion vary. Integral brightness adjustment is not the same as compatibility with an external dimmer. Confirm the exact fixture and control combination rather than assuming all LED sign lights share a dimming method.
Outdoor sign lighting questions
Can I use the WAC 5222 for a commercial sign?
It is an option to evaluate for an externally illuminated sign where its 120V input, adjustable distribution, and approved mounting fit the project. Match its photometrics to the sign instead of choosing by wattage alone.
Is 120V brighter than 12V?
Voltage identifies the required supply, not brightness. Compare delivered light and distribution. A compatible low-voltage system may also serve a sign; never connect a 12V fixture directly to line voltage.
Why is my sign bright in the middle but dark at the edges?
The beam may be too concentrated, the fixture too close, or the aiming and spacing unsuitable. Adjust coverage before adding output. Check glossy reflections from the actual viewing position too.
Compare 120V flood and sign-lighting fixtures, or read outdoor wall wash placement and spacing for broader facade illumination. For fixture categories, use flood versus spot versus wall wash lights.
- Jenny Branch